Linux
Requirements
Linux offers the best experience and fastest speed when working with containers. Besides avoiding the need for virtualization, when we develop we usually target Linux for production. File-system speed and permissions don't fit well when not using something made for Linux. Although there is love for all operating systems, Linux is really shining here.
Examples follow the Ubuntu distribution but can easily be adapted to any distribution.
01 Quick guide
Update your system
sudo apt-get update -y && sudo apt-get upgrade -y
Install development tools
sudo apt-get install -y build-essential
sudo apt install apt-transport-https ca-certificates curl software-properties-common -y
Install the docker container engine — this does NOT install Docker Desktop
sudo curl -fsSL https://download.docker.com/linux/ubuntu/gpg -o /etc/apt/keyrings/docker.asc
echo "deb [arch=$(dpkg --print-architecture) signed-by=/etc/apt/keyrings/docker.asc] https://download.docker.com/linux/ubuntu $(. /etc/os-release && echo "$VERSION_CODENAME") stable" | sudo tee /etc/apt/sources.list.d/docker.list > /dev/null
sudo apt update -y
sudo apt-get install -y docker-ce docker-ce-cli containerd.io docker-buildx-plugin docker-compose-plugin
sudo usermod -aG docker ${USER}   # restart your terminal after adding your user to the docker group
sudo systemctl enable docker      # start docker on boot
sudo systemctl restart docker     # start docker now
sudo systemctl is-active docker   # check docker is running
docker run hello-world            # test — docker cli must run without sudo at this point
Install the podman container engine and podman-compose
sudo apt-get install -y podman podman-compose
Distributions usually ship very old podman versions. For more recent versions use the Alvistack project, which provides repositories for most Linux flavors.
Open Container Desktop
Connect to the System Podman or System Docker default connection and all should work.
02 Podman acting as Docker
This is referred to as Compatibility Mode — it should support all docker features, except the docker cli (use podman instead; you can alias it if you want).
Start the podman api listening to /var/run/docker.sock
export DOCKER_HOST=/var/run/docker.sock
podman system service --time=0 unix://${DOCKER_HOST} --log-level=debug
After this point, one can use podman or docker or any other tool that uses the socket.
03 Docker Desktop alternative
This is so easy — follow the Quick guide to support both docker and/or podman, or just skip the podman part and focus on docker only.
macOS
Requirements
On macOS, virtualization (via Lima or colima) is required for the Podman and Docker engines — they run inside a Linux VM. Apple™ Container is a third option: a native Apple-silicon runtime that needs no VM (experimental; see section 5 below). Homebrew is seriously recommended to simplify provisioning and setup. Due to high cost, Container Desktop does not currently afford an Apple subscription to digitally sign applications, nor a digital certificate.
Install homebrew (as a non-administrator user)
/bin/bash -c "$(curl -fsSL https://raw.githubusercontent.com/Homebrew/install/HEAD/install.sh)"
brew update
brew upgrade
01 Quick guide
Install colima
brew install colima
Start the colima VM
colima start --vm-type=vz --vz-rosetta
This uses the native macOS virtualization framework, allowing even x86 container images to run and avoiding volume-mount file-system permission issues.
You can also use custom distribution images for the docker host OS — see the colima-core releases. After downloading the image of choice:
colima start --vm-type=vz --vz-rosetta --disk-image ~/Downloads/ubuntu-26.04-minimal-cloudimg-arm64-docker.qcow2
Install docker CLI tools and plugins
brew install docker docker-compose docker-buildx
This does not install Docker Desktop — only the command line tools that will use the colima docker engine. For the docker cli to find the plugins, add the following to your ~/.docker/config.json:
"cliPluginsExtraDirs": [
  "$HOMEBREW_PREFIX/lib/docker/cli-plugins"
]
After all of the above you should have a completely compatible docker engine running on your Mac.
If the docker command is not found after the install, Homebrew placed the formula in its Cellar without creating the docker symlink (it was left unlinked, so it is missing from your shell entirely — not a PATH problem). Link it explicitly:
brew link docker
docker --version   # confirms the CLI is now available
Allow the unsigned app to run (optional)
If you downloaded and installed Container Desktop for macOS, allow it to run despite the missing digital signature:
xattr -d com.apple.quarantine /Applications/Container\ Desktop.app
Open Container Desktop
Connect to the System Docker default connection and all should work.
02 Podman and Docker — best experience
Install lima
LIMA uses macOS native virtualization to provide Linux environments — it is like WSL, but for macOS.
brew install lima
Podman VM
limactl start podman   # start the podman VM
limactl shell podman   # login to the podman VM
Docker VM
limactl start docker   # start the docker VM
limactl shell docker   # login to the docker VM
03 Podman acting as Docker
This is referred to as Compatibility Mode — it should support all docker features, except the docker cli (use podman instead; alias it if you want).
Latest and greatest
Go to the Podman releases page and install the latest macOS pkg for your CPU. Consider:
- Upon installation, podman creates its own VM, also known as Podman Machine.
- It also sets the
DOCKER_HOSTenvironment variable to point at the podman unix socket, making it easy for the docker cli to use it.
Easiest (skip if using latest and greatest)
brew install podman
04 Docker Desktop alternative
Using colima offers the easiest experience — just follow the Quick guide to support docker in full compatibility.
(*) Optional: native docker CLI without homebrew
Not recommended due to complexity. Latest docker CLI and plugin binaries can be found at:
- Apple CPUs — download.docker.com/mac/static/stable/aarch64
- Intel CPUs — download.docker.com/mac/static/stable/x86_64
05 Apple™ Container Experimental
Apple's container engine is a native macOS container runtime for Apple silicon. Container Desktop support is experimental: the app targets the Docker-compatible API exposed by socktainer, not Apple's private XPC service directly.
Requirements
- Apple silicon Mac.
- macOS 26 Tahoe recommended. macOS 15 can run Apple
container, but networking is degraded and some network commands are unavailable. - Apple's
containerCLI installed from the official GitHub releases. - A compatible
socktainerinstallation to expose a Docker Engine API socket.
Install Apple™ Container
Download the signed installer package from the Apple container releases, verify it, install it, then start the system service. The example below pins Apple™ Container 1.0.0; if you choose a newer release, use that release's package name and checksum instead.
mkdir -p ~/Downloads/container-desktop-provision
cd ~/Downloads/container-desktop-provision

curl -L -o container-1.0.0-installer-signed.pkg \
  https://github.com/apple/container/releases/download/1.0.0/container-1.0.0-installer-signed.pkg

shasum -a 256 container-1.0.0-installer-signed.pkg
# expect: 13f45f26da94c354adcbefe1e8f7631e7f126e93c5d4dd6a5a538aa66b4f479d

sudo installer -pkg container-1.0.0-installer-signed.pkg -target /

container system start
Install socktainer
Install the Docker-compatible API bridge:
brew tap socktainer/tap
brew install socktainer
Start socktainer in the background and confirm that it exposes the Docker-compatible Unix socket:
mkdir -p ~/.socktainer
nohup socktainer > ~/.socktainer/socktainer.log 2>&1 &

sleep 2
test -S "$HOME/.socktainer/container.sock" && echo "socktainer socket OK"
Verify the socket with the Docker Engine API endpoints Container Desktop uses:
curl --unix-socket "$HOME/.socktainer/container.sock" http://localhost/_ping
curl --unix-socket "$HOME/.socktainer/container.sock" http://localhost/version
Homebrew also prints a service-mode option after installing socktainer. In that mode, socktainer runs with a Homebrew-owned HOME, so the socket is not under your user home. Use this if you want socktainer to start at login:
brew services start socktainer

SOCKTAINER_HOME="$(brew --prefix)/var/run/socktainer"
export DOCKER_HOST="unix://$SOCKTAINER_HOME/.socktainer/container.sock"

curl --unix-socket "$SOCKTAINER_HOME/.socktainer/container.sock" http://localhost/_ping
Or run the same service-style command manually without registering a login service:
SOCKTAINER_HOME="$(brew --prefix)/var/run/socktainer"
HOME="$SOCKTAINER_HOME" "$(brew --prefix)/opt/socktainer/bin/socktainer"
If you use Homebrew service mode with a remote Mac connection, configure Container Desktop to use the service socket path explicitly: $(brew --prefix)/var/run/socktainer/.socktainer/container.sock. For development env-seeded connections, that is CONTAINER_DESKTOP_REMOTE_<ID>_APPLE_SOCKET, for example:
CONTAINER_DESKTOP_REMOTE_MAC_APPLE_SOCKET=/opt/homebrew/var/run/socktainer/.socktainer/container.sock
Socktainer can also register a Docker context named socktainer, so the official Docker CLI can use Apple containers without changing Container Desktop's resource model.
Remote Mac over SSH
Because socktainer exposes a Unix socket, it can be forwarded over SSH in the same style as remote Docker or Podman sockets. With the per-user launch above, Container Desktop auto-detects $HOME/.socktainer/container.sock. With Homebrew service mode, use the explicit service socket path from the previous section. The remote host still has to be an Apple silicon Mac with Apple container and socktainer running; the client machine only needs SSH access to that Mac.
Windows
Requirements
On Windows, virtualization is required to support both podman and docker container engines. With WSL, the development experience has evolved — it is highly recommended to move away from msys/cygwin and just use WSL. Most of the time we deploy on Linux anyway, so an experience closer to reality is appropriate. It is also a good opportunity to learn Linux.
As a non-administrator user
winget install -e --id=Microsoft.WindowsTerminal
winget install "Container Desktop"
Enable and install WSL (as administrator)
dism.exe /online /enable-feature /featurename:Microsoft-Windows-Subsystem-Linux /all /norestart
dism.exe /online /enable-feature /featurename:VirtualMachinePlatform /all /norestart
winget install -e --id=Microsoft.WSL
Restart the computer, then set up the WSL distribution user account by starting wsl.exe in a Windows Terminal.
01 Quick guide
Enable and install WSL (as administrator)
winget install -e --id=Microsoft.WSL
- This installs the default Ubuntu distribution, fine for most users (Ubuntu-26.04 is current at the time of writing).
- It also installs a profile inside Windows Terminal, a great terminal emulator for Windows.
- After setting up your Linux user, follow the Linux installation guide to install docker and/or podman.
If WSL is already installed, update it and set version 2
wsl --update
wsl --set-default-version 2
As a non-administrator user
winget install -e --id=Microsoft.WindowsTerminal
winget install -e --id=Docker.DockerCLI
winget install -e --id=RedHat.Podman
winget install "Container Desktop"
Open Container Desktop
Create an automatic connection to your WSL distribution using either docker or podman engines. Choose your preferred one, make it default, and click Connect.
02 Podman and Docker — best experience
Requirements
Ensure all requirements are installed as per the requirements.
Custom WSL
Inside the WSL distribution, follow the Linux installation guide to install both podman and docker container engines.
Best developer experience
Perform all container operations inside the WSL distribution directly — it is just Linux in the end. WSL is the best way to run Linux on Windows.
03 Podman acting as Docker
This is referred to as Compatibility Mode — it should support all docker features, except the docker cli (use podman instead; alias it if you want).
Latest and greatest
Go to the Podman releases page and get the latest Windows installer. Consider:
- Upon installation, podman creates its own WSL distribution, also known as Podman Machine.
- It also sets the
DOCKER_HOSTenvironment variable to point at the podman named pipe.
Easiest (skip if using latest and greatest)
winget install -e --id=RedHat.Podman
04 Docker Desktop alternative
Requirements
Ensure all requirements are installed as per the requirements.
Add docker engine support
Inside the WSL distribution, follow the Linux installation guide to install the docker container engine.
Adding support for the native docker.exe binary
winget install -e --id=Docker.DockerCLI
A restart of your terminal is recommended after installing the CLI tools. Latest docker.exe binaries can also be found at:
- Intel CPUs — download.docker.com/win/static/stable/x86_64
05 Podman — custom installation
Podman engine setup inside WSL
Inside the WSL distribution, follow the Linux installation guide to install the podman container engine.
Container Desktop
Open Container Desktop and create a new Podman engine connection using the WSL host, selecting your distribution of choice.
07 Tips & tricks
Ensure WSL 2 and cgroups v2
To ensure WSL version 2 is set: wsl --set-default-version 2. For the recommended cgroups v2, modify or create the .wslconfig file in %USERPROFILE% with:
[wsl2]
# ...
kernelCommandLine = ipv6.disable=1 cgroup_no_v1=all
After modifying/creating, stop the WSL engine with wsl.exe --shutdown and restart with wsl.exe.
Good to know
Although possible, it is not required to install the Container Desktop application inside WSL.
AI Assistant
What it is
Container Desktop has a built-in AI assistant that understands your container setup and can inspect and operate it for you — in plain language. Ask "why did my web container exit?" or "show me the running containers" and it investigates and acts, right inside the app.
Open it from the AI menu in the header (the chat button — the caret beside it lists the Assistant and the generator). It is local-first: point it at a model running on your own machine and nothing leaves the device.
Choose your model
Pick your inference source → provider → model from the selector in the message box. Two kinds of source are supported:
- Local (no API key, runs on your machine): LM Studio and llama.cpp. Start the server, and the assistant lists its models — your prompts and container data never leave the device.
- Cloud (needs an API key): OpenRouter, Anthropic, OpenAI, DeepSeek, GLM and MiniMax. Add a key in Settings → AI; OpenRouter exposes many vendors' models behind one key.
Keys are stored in your operating system's keychain (encrypted at rest) and are only ever read in the background process — the interface never shows them back. A cloud model is only reached once you've added its key.
What it can do
The assistant doesn't just chat — it calls typed tools and renders the results as rich cards instead of walls of text:
- Look: list and inspect containers, images, networks and volumes, read a container's logs, and check its stats — shown as sortable tables, a log viewer, and state badges. These read-only actions run freely.
- Act: start / stop / restart / pause / remove a container, pull or remove an image, remove a network or volume. Every state-changing action asks for your approval first (see below).
- Escape hatch: for anything the typed tools don't cover, it can run a host command in a sandbox (no shell, scrubbed environment, output capped) — also gated by your approval.
Privacy & permissions
You decide what the assistant is allowed to run. The mode dropdown in the message box has three settings:
- Always ask — every state-changing action surfaces an Allow / Reject card; nothing is remembered.
- Ask and remember — approve (or decline) once, and that exact action is remembered so it won't ask again.
- Always allow — no prompts. Only choose this on a machine you fully trust.
A reject never runs. Review or revoke everything you've remembered — and the web-search switch — under Settings → AI permissions.
Local-first and private by design. Secrets (API keys, tokens) are redacted out of anything the model sees, and out of command output before it's read back. With a local model, your prompts and container details stay on your machine; a cloud model is only contacted after you've explicitly added its key.
Containerfile & Compose generator
A second AI screen (the caret in the header AI menu) drafts a Containerfile or a Compose file from a short description and a starter template, streamed as it writes, ready to copy or save. Same model picker, same privacy rules.
Using the app
Notification center & activity log
Open it from the bell at the far-right of the footer. It is a right-side panel with two tabs:
- Notifications — a history of the toasts the app shows (connection changes, action results), so a message you missed is never lost.
- Activity — a live, filterable log of every interaction with your container engine: each API call (e.g. List containers →
GET /containers/json) and every CLI command the app runs, with status, duration, and one-click Copy as cURL / Copy command.
Filter by text, by kind (API / CLI / System) or by severity; repeated calls collapse so the stream stays readable. Nothing is persisted — the log is in-memory for the current session, and you can pause or clear it from the panel header.
The Activity tab doubles as a learning tool — it shows exactly how Container Desktop drives Podman/Docker, so you can reproduce any action from a terminal.
Building images
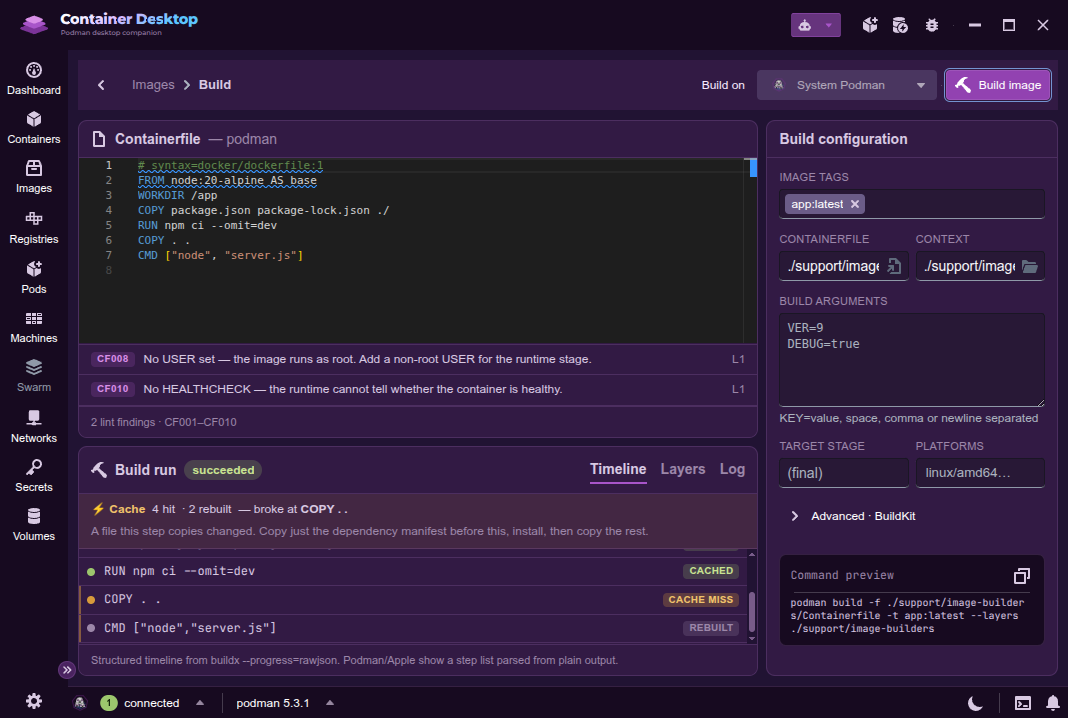
Container Desktop builds container images for you — no terminal required. Open the Build Studio from the Build image button on the Images screen: author a Containerfile in the built-in editor (it lints as you type), set your tags, build args, target stage and platforms in the configuration panel, then hit Build image to run it on a native Podman or Docker engine. The Build run panel streams a Timeline — every step with a cache hit / miss badge and its duration — and, after a successful build, a Layers tab with a dive-style waterfall of the image's layers and sizes.
Keyboard shortcuts
Find in the current view
Press Ctrl + F (Windows / Linux) or Cmd + F (macOS) to search whatever you are looking at — the find widget adapts to the view, with a match counter, next/previous and a case-sensitive toggle:
| View | What Find does |
|---|---|
| Container / pod logs, terminal | in-place search with match highlighting |
| Inspect, processes and other detail / list views | highlights matches across the page |
| JSON / YAML editors | the editor's built-in find |
| Resource lists | focuses the list's filter box |
| Key | Action |
|---|---|
Ctrl/Cmd + F |
open Find |
Enter / Shift + Enter |
next / previous match |
Esc |
close Find |
See every shortcut
Press ? anywhere in the app to open the built-in keyboard-shortcuts dialog, which lists all currently active bindings for the screen you are on.